
Wine Tasting Party Decorations for Elegant Home Events (DIY Ideas)
Ready to turn your living room into a cozy tasting room that feels special? A few smart wine tasting party decorations can set the mood, spark conversation, and make photos pop, all without spending a lot.
This guide shows you how to plan the vibe, pick a simple color palette, and style the tasting table so everything looks intentional. You’ll find essential decor ideas, from lighting and signage to glass markers and scent-safe flowers, plus quick DIY swaps that save money.
By the end, you’ll have a clear plan for elegant home events that feel immersive and relaxed. Grab your favorite bottles, we’ll handle the look.
Planning Your Wine Tasting Party Decorations
Start with a clear plan, then build from there. Pick a theme, choose a tight color palette, and scale decor to your space and guest count. The goal is simple, create a warm setting that invites conversation and keeps the wine front and center.
Choosing the Perfect Theme
A theme keeps decisions easy and the look cohesive. It guides colors, textures, and the small details that pull a room together.
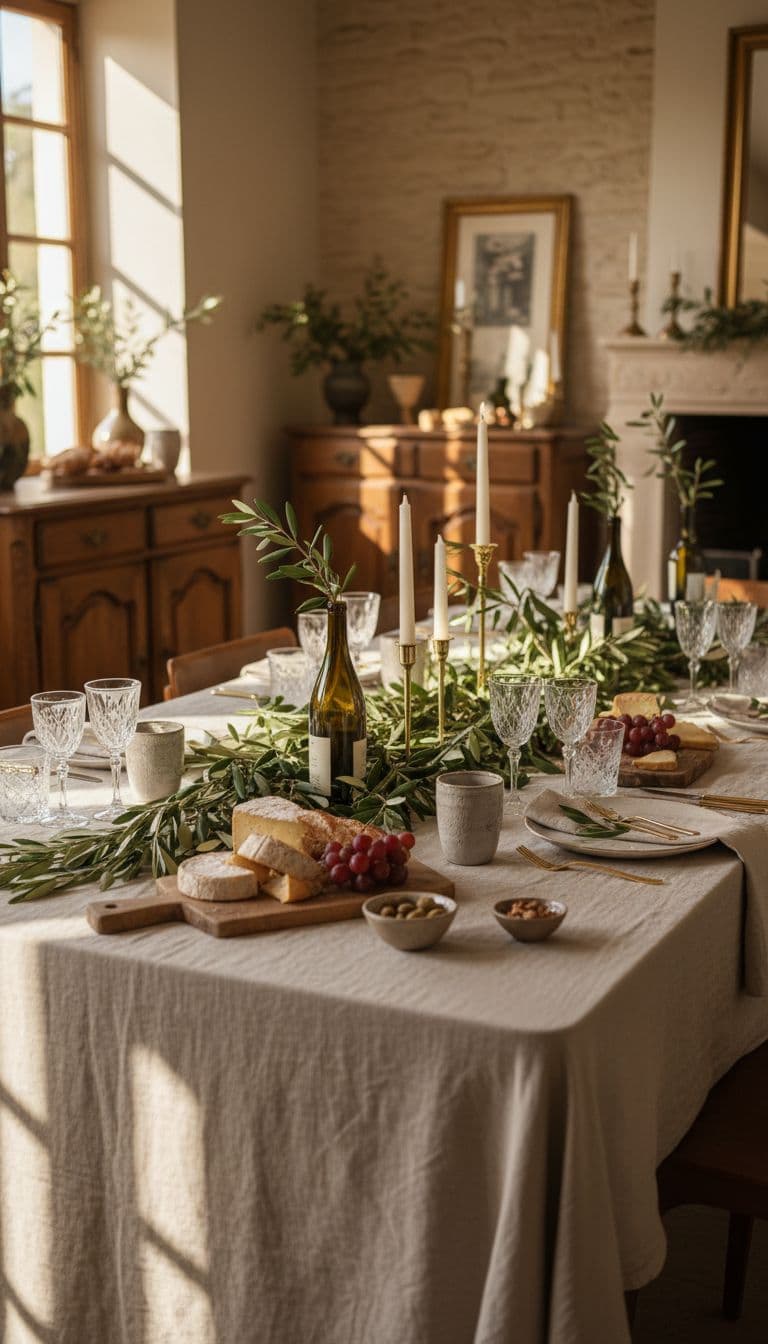
- French countryside: Soft linens, olive branches, vintage glassware, and rustic bread boards. Add grapevine garlands and a chalkboard wine list.
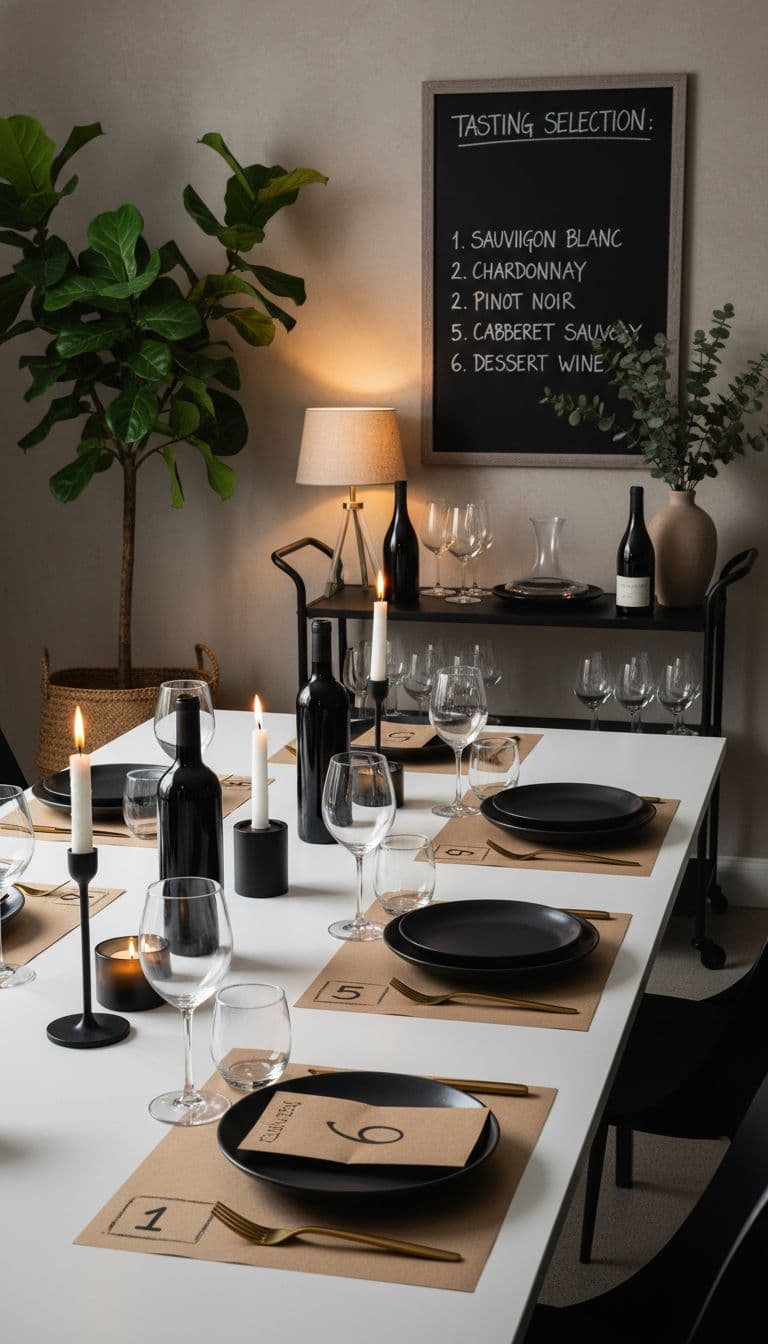
- Modern vineyard: Clean lines, black or charcoal accents, matte ceramics, and clear glass. Use minimal greenery and a single bold graphic, like a wine bottle silhouette.
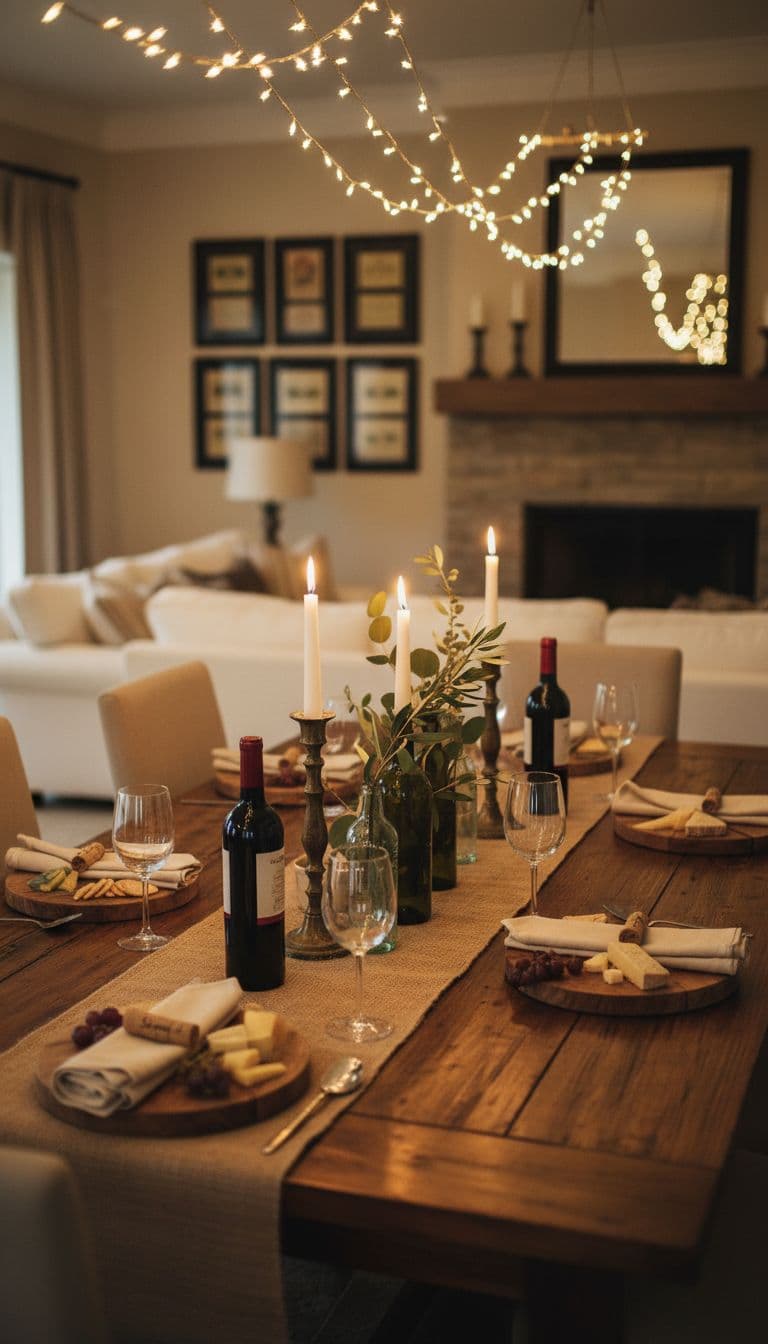
- Rustic winery: Reclaimed wood, burlap runners, iron accents, and warm lighting. Style a small wine barrel as a side table or serve station.
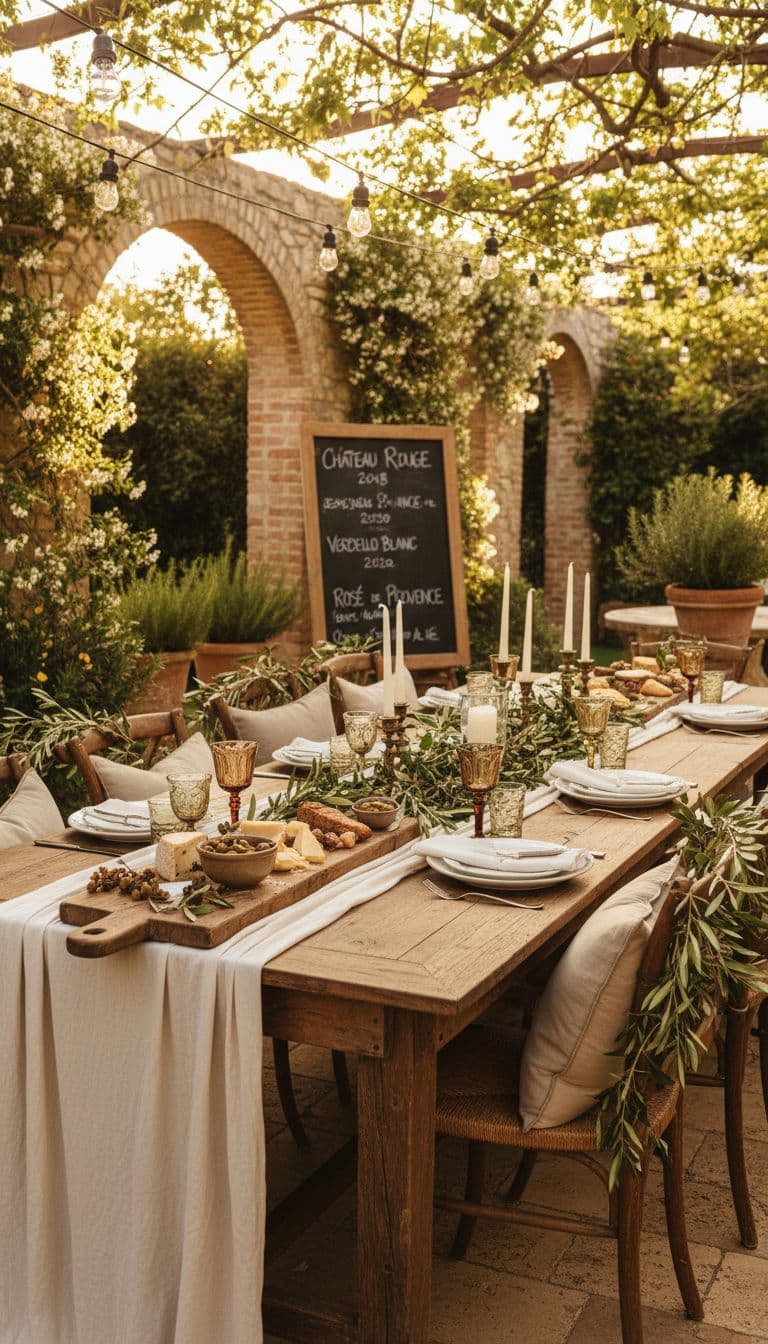
- Vineyard chic: Elegant but relaxed. Linen tablecloths, gold flatware, neutral florals, and subtle grape motifs on place cards.
Work motifs in lightly so the room feels curated, not themed. Try:
- Grapevines: Faux or real vines along a runner or around a bar tray.
- Wine barrel touches: Mini barrel planters, barrel-top trays, or round wood chargers.
- Corks: Corks as place card holders or scattered in a clear vase.
Plan with the room in mind. Count guests, then map the flow.
- Keep 24 inches per seated guest and elbow room at tasting stations.
- Use a single long table for flights, or two small stations to prevent crowding.
- Place water, spit cups, and bread within easy reach to cut traffic.
- Leave pathways clear so people can mingle without bumping glassware.
Theme directs your shopping list. If you choose rustic winery, skip chrome and pick warm wood, linen, and aged metal. If you go modern, choose sleek trays, simple menus, and monochrome accents.
Setting the Mood with Lighting and Colors
Lighting shapes the entire experience. Aim for soft, layered light that flatters the room and the wine.
- String lights: Drape along a mantle, shelf, or window for a gentle glow.
- Candles: Use unscented tapers or votives to avoid clashing with aromas. Cluster in odd numbers for balance.
- Table lamps: Warm bulbs at 2700K add cozy light without glare.
- Dimmers: Lower overhead lights to reduce harsh shadows on the table.
Color sets tone and appetite. Warm tones feel welcoming and enhance the wine experience.
- Deep reds and burgundy: Suggest richness, pair well with red flights.
- Gold accents: Add elegance and warmth without stealing the show.
- Neutrals: Ivory, taupe, greige, and soft gray let glassware and labels stand out.
- Greens: Olive or sage bring a vineyard note and calm the palette.
- Cool accents: Slate or charcoal add a modern edge when used sparingly.
Layer colors in simple steps so the table reads intentional.
- Base: Neutral linen or kraft paper runner to ground the scene.
- Secondary color: Napkins, menu cards, or chair ribbons in burgundy, olive, or charcoal.
- Metallic touch: Gold-rimmed glasses, brass candleholders, or a metallic pen for labels.
- Florals and foliage: Keep it scent-safe. Use eucalyptus, olive branches, or dried grasses in muted tones.
Example palette for a rustic winery theme:
- Neutrals: Oatmeal linen, warm wood
- Accent: Burgundy napkins, olive greenery
- Metal: Aged brass candleholders
Keep the balance right. Three to four colors are plenty. Repeat each color at least three times across the room, such as napkins, place cards, and a ribbon on the decanter. This ties the space together and keeps the focus where it belongs, on the wine and the people enjoying it.
Essential Decorations for an Elegant Setup
Style with intention, then keep the focus on the wine. Choose decor that frames the tasting, guides flow, and adds texture without crowding the table. Aim for reusable pieces, neutral bases, and a few beautiful accents guests will notice in photos.
Stylish Table Settings and Centerpieces
Set a clean base so glassware and bottles shine. Use an ivory or oat linen, a natural runner, and soft napkins. Add depth with warm wood, matte ceramics, and a few brass touches.
- Wine-themed glassware: Place a universal stem at each seat, plus a small water glass. Add a decanter or two for aeration. If space is tight, set flights on a tray so pours stay tidy.
- Placemats with purpose: Choose linen, cork, or thick kraft paper. Print or handwrite numbered circles for each pour. This keeps tasting notes organized and helps with blind flights.
- Centerpieces that do not fight aromas: Keep flowers low and unscented. Try recycled wine bottles as vases with olive branches, eucalyptus, or dried grasses. For color, add a shallow bowl of grapes, figs, or pears. It reads vineyard, not floral shop.
Pick pieces you can reuse, then mix them across events.
- Cloth napkins over paper
- Glass water bottles instead of plastic
- Beeswax or soy votives, unscented
- Neutral runners and wood boards you will use again
Label wines with a light hand so the table stays elegant.
- Hanging bottle tags: Use kraft or linen tags with neat script. Number them to match placemats.
- Table tent cards: Small, clean cards with region and grape. Add a gold binder clip for polish.
- Slate or chalk markers: Write numbers on decanters or glasses. Wipe clean after.
- Pro tip: Keep the reveal details under the card. Fold it back when it is time to discuss.
Arrange from left to right for each guest, water on the outer right, bread and spit cup within easy reach. Leave negative space so hands can move without bumping stems.
Wall and Room Decor Ideas
Dress the room in a few smart spots, not everywhere. Choose one focal wall and one accent, then keep the rest calm.
- Grape cluster garlands: Drape faux grapevines or olive branches along a mantle or shelf. Use two to three anchor points so it looks intentional, not droopy.
- Framed wine labels: Save favorite labels, mount on linen paper, and frame in simple black or wood. Hang in a grid for a tidy, gallery feel.
- Chalkboard or acrylic menu: List flights, regions, and order. Keep the handwriting bold and simple so guests can read it across the room.
Define tasting zones without clutter.
- Roll out a neutral area rug under the main table to ground the space.
- Add a fabric or paper backdrop behind a bar cart. Think linen curtain, burlap panel, or kraft paper with a hand-lettered title.
- Use a narrow console as a water and palate cleanser station. This frees the main table for wine and notes.
Plan flow like a small café. Place the tasting station first, the water and bread to the side, and the dump bucket at the end. Keep pathways clear by pulling furniture off the edges, not into the center.
Fun Themed Props and Accessories
Small props add charm and invite guests to engage. Keep them tasteful, tied to the theme, and easy to grab.
- Cheese boards with vine motifs: Olive wood or acacia boards etched with a leaf or grape detail. Add cheese markers for style and clarity.
- Personalized name tags: Mini tags tied to stems with twine, or clip-on charms in a single metal tone. Print names and, if you like, the guest’s preferred style, like “Pinot lover.”
- Photo booth props: Flat cutouts of wine glasses, corkscrews, and bottle silhouettes. Include a simple sign like “Sip, swirl, smile.” Place them in a ceramic crock near good light.
These pieces make the event more interactive.
- Guests pose with props, snap quick photos, and share highlights.
- Name tags prevent glass mix-ups and help conversation.
- Cheese markers and board labels prompt tasting notes about pairing.
Set a small accessories tray near the entrance. Stock pens, scorecards, extra tags, and a few clips. Clear containers and a labeled spot keep the surface tidy as the night goes on.
Budget-Friendly and DIY Decoration Tips
You can stage a polished tasting without a big budget. Focus on a few high-impact pieces, then fill in with thrift finds and smart DIY. Reuse what you own, shop simple, and let handmade details add personality. Your guests will remember the thoughtful touches, not the price tag.

Affordable Sourcing Strategies
Stretch your budget by mixing low-cost buys, secondhand scores, and borrowed items. Keep your color palette neutral so pieces work across future events.
- Dollar stores: Pick up balloons, banners, tea lights, napkins, kraft paper, and clear vases. Choose solids over prints for a cleaner look.
- Online marketplaces: Search for bulk glassware, trays, candleholders, frames, and bar carts. Set alerts for “lot,” “wedding,” or “event” to find bundles at a discount.
- Thrift shops: Look for linen tablecloths, wood boards, brass candlesticks, and picture frames. Mismatched frames look cohesive if you paint them one color.
- Borrow from friends: Ask for extras like folding chairs, string lights, cake stands, coolers, and carafes. Return items clean and labeled, and you will be first on the list next time.
- Seasonal sales: Stock up after holidays when candles, ribbons, and string lights drop in price. Buy classic colors like ivory, gold, and olive.
- Upcycle: Save wine bottles for vases, jars for tealights, and corks for place cards. A quick wash and a coat of paint can turn “recycle” into “refined.”
Prioritize what guests touch and notice first. Add extras only if the essentials are covered.
| Priority | Items to Secure First | Nice-to-Haves |
|---|---|---|
| High | Table linen, napkins, glassware, candles, signage for flights | Banners, balloons, confetti |
| Medium | Trays, risers, vases, menu stands | Photo props, themed stir sticks |
| Low | Specialty backdrops, novelty lights | Extra florals, duplicate decor |
Quick wins for a high-end look:
- Neutral base: One good linen or a quality faux linen runner upgrades everything around it.
- Repeat materials: Wood, glass, and brass used three times each tie the room together.
- Edit: Remove one item from every surface for breathing room and better photos.
Simple DIY Projects to Try
Short on time? Pick quick builds that give the most visual payoff. Batch tasks and stick to two or three projects max.
- Painted Wine Cork Name Cards Turn leftover corks into tidy place markers that match your palette.
- Materials: Wine corks, acrylic paint or paint pens, fine-tip marker, craft knife.
- Steps:
- Lightly sand any rough edges on the corks.
- Paint a stripe or dip one end, then let dry.
- Use a craft knife to cut a shallow slit along the top.
- Write names on small cards, slide into the slit.
- Style tip: Add a tiny sprig of olive or rosemary behind the card for a vineyard touch.
- Time: 25 to 40 minutes for 12 corks.
- Hack: Pre-cut name cards using a business card template for perfect sizing.
- Fabric-Wrapped Bottle Vases Create elegant vases from empty bottles using scrap fabric or old napkins.
- Materials: Clean wine bottles, fabric strips, double-sided tape or hot glue, ribbon or twine.
- Steps:
- Remove labels by soaking bottles in warm, soapy water.
- Wrap fabric around the bottle with tape or a thin glue line.
- Finish with a narrow ribbon at the neck.
- Fill with eucalyptus, olive branches, or dried grasses.
- Style tip: Use two fabrics in the same color family for depth, like oatmeal and taupe.
- Time: 10 to 15 minutes per bottle.
- Hack: Wrap only the center third of each bottle to save time and fabric.
- Kraft Paper Tasting Runner A fast, clean base that doubles as a guide for pours and notes.
- Materials: Kraft paper roll, black marker, round object for tracing.
- Steps:
- Roll paper down the table and tape underneath.
- Trace three to five numbered circles per guest.
- Add headings for region, grape, and notes.
- Time: 15 minutes for a 6-person table.
- Hack: Create one template page, then slide it under the paper and trace.
- Quick Chalkboard Menu From a Thrifted Frame Turn any frame into a reusable tasting board.
- Materials: Frame with glass, chalkboard paint or matte black spray, chalk pen.
- Steps:
- Remove glass, paint it, let dry fully.
- Place glass back in the frame.
- Write the flight order in bold, simple lines.
- Time: 30 to 40 minutes, excluding dry time.
- Hack: Use a chalk pen for clean lines that wipe off with water.
Fast host tips:
- Batch in tens, paint or cut all pieces at once for speed.
- Stick to two colors plus one metal, less time deciding, more time styling.
- Lay a drop cloth, set up an assembly line, and finish all DIY in one session.
- Prep the week before, final touches the day before, table set by noon day-of.
DIY makes the space feel personal, not generic. A few handmade accents, paired with smart sourcing, deliver a high-end look without the high-end bill.
Conclusion
A polished wine tasting party starts with a clear theme, a tight color palette, and layered lighting that flatters the room and the wine. Keep decor scent-safe, label flights cleanly, and use simple DIY touches to add style without clutter. Plan flow with stations and negative space so guests relax, talk, and capture great photos. Small, thoughtful details turn elegant home events into easy nights people remember.
Set a date, gather a few bottles, and try these wine tasting party decorations this weekend. Share your favorite idea in the comments, and subscribe for more smart party tips.